If your current faucet is leaking or looking worse for wear, it might be time for an upgrade. Upgrading your fixtures can reduce water waste by up to 30%, saving you money on your monthly bills. But how do you replace the kitchen faucet without turning your kitchen into a swamp?
Many homeowners assume this job requires a professional plumber and hours of expensive labor. The good news? You can completely replace your faucet and install a new one with a little time, the right tools, and a clear, step-by-step approach. Read on!
Tools Needed to Replace a Kitchen Faucet
Preparation makes the whole process easier. To clear the path and create a smooth workflow, you will need:
- Adjustable wrench. You’ll need this to loosen and tighten the main connections.
- Basin wrench. This special tool is essential to reach tight spaces behind the sink basin.
- A bucket and towels. Always place a bucket under the valve to catch residual water.
- Safety glasses. You don’t want old debris falling into your eyes while you look up under the sink.
Once your tools are ready, clean out the area under the sink. Getting access is critical. You need to reach the supply lines and the mounting nuts comfortably.
Understanding the basics covered in the guide to faucet repair services can help homeowners feel more prepared before starting a faucet installation project.
Detach the Old Faucet
For most people, the hardest part of this entire process is actually removing the old faucet.
But don’t worry, patience is key here.
Step 1: Turn Off the Water
Look under the sink for the hot and cold water valves. Turn them clockwise until they stop. Then go up and turn on your faucet to release any remaining pressure. If you don’t hear any water running, you’re good to go. Problems with pressure or shut-off valves may indicate larger plumbing concerns covered in high water pressure solutions.

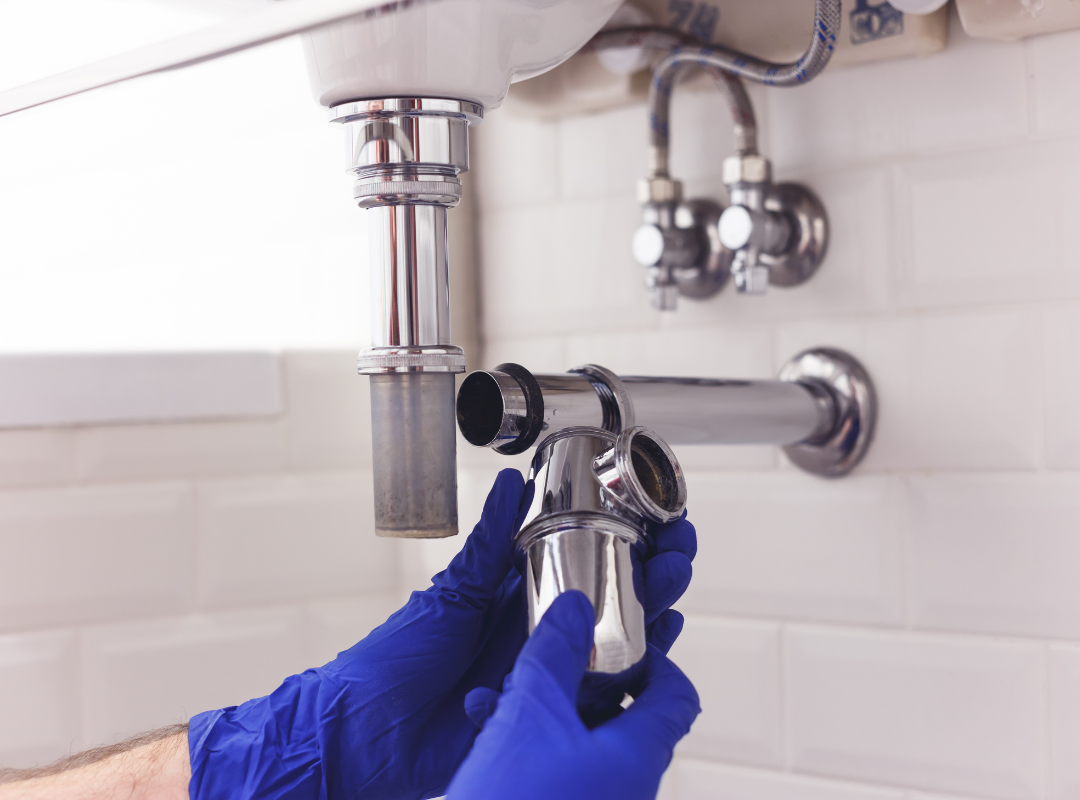
Step 2: Disconnect the Faucet Lines
Next, use your adjustable wrench to disconnect the faucet lines from the shut-off valves. Make sure your bucket is in place to catch the water that will inevitably drip out.
- If the connection won’t budge, apply some penetrating oil and wait 15 minutes.
- Hold the valve steady with a second wrench to avoid breaking the pipe inside the wall.
Older plumbing systems may develop hidden leaks over time, making it important to detect copper water line leaks before beginning repairs.
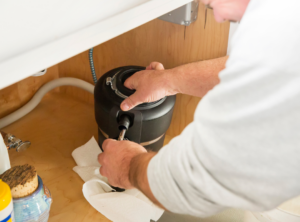
Step 3: Remove the Mounting Hardware
You will see a large nut (or nuts) holding the faucet to the counter. This is where your basin wrench comes in handy. It’s designed to reach up into that narrow gap. Turn the nut counterclockwise to remove it.
Once the hardware is off, pull the old faucet up and out of the sink.

Prep the Sink for the New Faucet
You must clean this area thoroughly before you place the new one. Use an abrasive sponge and some multi-purpose cleaner to scrub away the years of buildup. If your new kitchen faucet requires fewer holes than the old one, you have a couple of options.
Many new units come with an escutcheon plate (or deck plate) designed to cover extra holes. Alternatively, if your new faucet only needs one hole but you have three, you can use one of those extra holes to install a matching soap dispenser.
Maintaining clean fixtures and plumbing connections is an important part of plumbing maintenance for preventing future issues.
How to Install the New Kitchen Faucet
Whether you’re reading this guide via an HTTP server or watching a quick tutorial, the installation sequence is generally the same across modern brands.
Step 1: Feed the Lines
Start by feeding the new faucet lines down through the center hole (or the deck plate, if you are using one). Make sure the faucet is seated firmly against the sink. If you are doing this solo, it’s helpful to have someone hold the faucet up top while you work underneath.
Step 2: Secure the Hardware
Get back under the sink and slide the washer and mounting nut over the lines. Hand-tighten the nut as much as possible, then use your basin wrench to secure it. Make sure the faucet is perfectly aligned before you give it the final tightening turn.
Step 3: Connect the Spray Head and Hose
If you purchased a pull-down model, you will need to attach the spray head hose to the main supply pipe under the sink. Usually, this just snaps together with a quick-connect fitting.
Next, attach the weight to the hose. The weight pulls the spray head back into the spout. Test it a few times to ensure it retracts fully without catching on the other pipes.

Step 4: Connect the Water Lines
Finally, connect the hot and cold supply lines to the corresponding valves. The hot line is usually on the left, and the cold is on the right. Tighten them with your adjustable wrench, but be careful not to over-tighten and strip the threads.
Over-tightened fittings can contribute to plumbing damage, which is why homeowners should understand the causes of high water pressure and related pipe stress issues.
Final Thoughts
Replacing a kitchen faucet doesn’t have to be a stressful ordeal. By gathering the right tools, understanding the removal process, and taking your time with the installation, you can completely transform your kitchen’s functionality and style. If you run into trouble, there is no shame in asking for help. A professional plumber can complete this task in a fraction of the time, guaranteeing a leak-free setup.
Frequently Asked Questions
Q1: How long does it typically take to replace a kitchen faucet?
A: For an average homeowner, replacing a kitchen faucet usually takes between one and three hours. The hardest part is almost always removing the old faucet, especially if the nuts are rusted. If you hire a professional like Tommie’s Plumbing, the job can often be completed in under an hour.
Q2: Do I need to replace the shut-off valves when I install a new faucet?
A: Not always. However, if your current valves are heavily corroded, leaking, or won’t shut off completely, it is highly recommended to replace them at the same time. If you live in areas like Johnson City or Kingsport, hard water can degrade these valves more quickly, making replacement a smart preventive measure.
Q3: What should I do if the water supply lines are too short?
A: If the built-in lines on your new kitchen faucet don’t reach the valves, you can easily purchase supply line extensions at a local hardware store. Just make sure you get the correct thread sizes to connect everything securely.
Q4: Why is my new pull-down spray head not retracting properly?
A: This is usually an issue with the hose weight. Make sure the weight is attached at the correct spot on the hose loop (usually marked by a sticker). If you need help adjusting it, Tommie’s Plumbing can easily resolve the issue for you.
Q5: Can I install a single-hole faucet on a three-hole sink?
A: Yes, you absolutely can! Most single-hole faucets come with an optional deck plate specifically designed to cover the extra holes. If you’re remodeling your kitchen in Bristol or Greeneville and want a seamless installation, the team at Tommie’s Plumbing can help you configure the perfect sink setup.